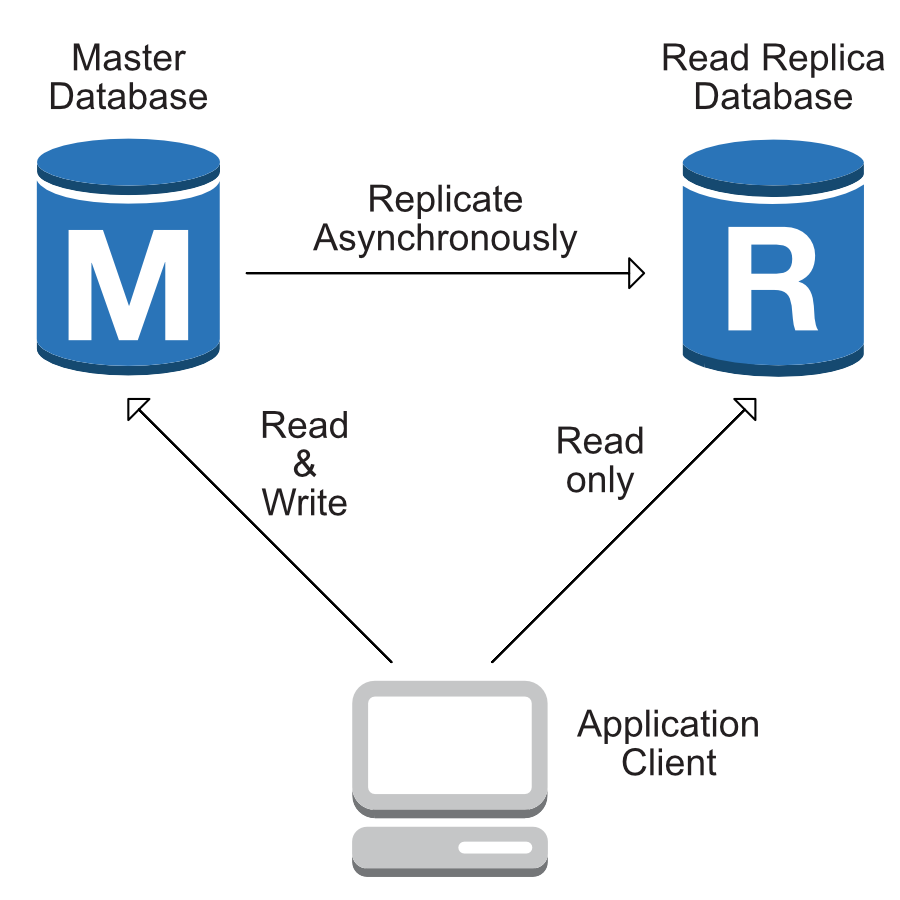
At Turnitin we deal with quite a lot of traffic, the vast majority of database operations are reads. Splitting our databases and creating read replicas (slaves) is necessary in order to make sure we are not hindering write operations to the master database, but what good is managing these extra replicas if our applications cannot read from them?
Spring Boot makes it relatively easy for us to split these operations, you can find an example project using this code here, but we’ll talk through the most important parts of it in this post.
The DataSource
Spring Boot will normally configure a DataSource for you after you have provided some configuration details, that isn’t going to be enough in this case as we’re wanting to talk to multiple sources of data.
This post is going to explore the use of AbstractRoutingDataSource in order to route our requests to the right place.
Routing Connections
The following block of code will enable us to route connections to different sources, let’s take a look at it and then talk through what’s happening.
public class RoutingDataSource extends AbstractRoutingDataSource {
	private static final ThreadLocal<Route> ctx = new ThreadLocal<>();

	public enum Route {
		PRIMARY, REPLICA
	}

	public static void clearReplicaRoute() {
		ctx.remove();
	}

	public static void setReplicaRoute() {
		ctx.set(Route.REPLICA);
	}

	@Override
	protected Object determineCurrentLookupKey() {
		return ctx.get();
	}
}
This DataSource will work in combination with Springs TransactionsManager, whenever the TransactionsManager requests a connection to the database it will bind the connection to a thread and then call determineCurrentLookupKey().
This is super handy for us because that means we can utilize ThreadLocal in order to route a connection to our primary or replica databases.
The DataSource
Now we’ve built out our own RoutingDataSource implementation, we need to create a DataSource that makes use of it. You can view the full configuration here, but the most important block of code will be discussed here
@Bean
@Primary
public DataSource dataSource() {
  final RoutingDataSource routingDataSource = new RoutingDataSource();

  final DataSource primaryDataSource = buildDataSource(...);
  final DataSource replicaDataSource = buildDataSource(...);

  final Map<Object, Object> targetDataSources = new HashMap<>();
  targetDataSources.put(RoutingDataSource.Route.PRIMARY, primaryDataSource);
  targetDataSources.put(RoutingDataSource.Route.REPLICA, replicaDataSource);

  routingDataSource.setTargetDataSources(targetDataSources);
  routingDataSource.setDefaultTargetDataSource(primaryDataSource);

  return routingDataSource;
}
We’re going to gloss over the calls to buildDataSource(...) these are just creating generic DataSource’s that we will then use to route our connections, you can view the specifics of that here, but there’s no magic.
The RoutingDataSource does the most of the heavy lifting, we’ve created a map of target DataSource’s keyed by the enum values we specified in our RoutingDataSource, a default DataSource is set for times when our routing context is null or empty. Now whenever the TransactionsManager makes a call to determineCurrentLookupKey() it will have a method of looking up the DataSource we’ve requested.
Routing with AOP
We’re almost there, we have separate DataSources built and a method with which to tell the TransactionManager where to route our connection, but how are we going to have our code switch the routes for us?
A common method of ensuring objects returned from our DataSources are immutable is by using the @Transactional annotation in the following fashion.
@Transactional(readOnly = true)
public Book get(final Integer id) {
	return bookRepository.findById(id).orElse(null);
}
So if we’re happy to say that we expect objects making use of the @Transactional annotation with the readOnly flag to be immutable then I’d also be happy routing this traffic to our read replica, so let’s do that with an interceptor.
The Interceptor
The full interceptor can be viewed here, i’ve snipped a little bit for the sake of ensuring readability in this post.
@Aspect
@Component
@Order(0)
public class ReadOnlyRouteInterceptor {

	@Around("@annotation(transactional)")
	public Object proceed(ProceedingJoinPoint pjp, Transactional tx) ... {
		try {
			if (tx.readOnly()) {
				RoutingDataSource.setReplicaRoute();
			}
			return pjp.proceed();
		} finally {
			RoutingDataSource.clearReplicaRoute();
		}
	}
}
Nice and simple! We’re doing a quick check on whether the readOnly flag has been set on the transactional annotation of the method we’ve intercepted and if it has been, we’re enforcing the replica route and proceeding with the execution, once it’s finished we clear the route.
One thing that might stick out is the use of @Order(0), we need to ensure that our Interceptor runs before a connection to a DataSource is built. We can control that by setting an order with a high priority so that we can guarantee our interceptor runs before that happens.
Is that it?
That’s it! Let’s take a look at a sample application and make both a read and a write in order to verify everything is working as expected.
public static void main(String[] args) {
	ApplicationContext ctx = SpringApplication.run(Launcher.class, args);

	ctx.getBean(BookService.class).save("Test Author");
	ctx.getBean(BookService.class).get(1);
}
Now if we take a look at postgres logs when we execute these queries we can see that there are two separate transactions and that one is ran by our fable_write user and the other by our fable_read user.
Perfect, Spring is properly selecting a DataSource based on the readOnly value of the @Transaction annotation. Mission accomplished!
fable_readLOG: SET SESSION CHARACTERISTICS AS TRANSACTION READ WRITE
fable_writeLOG: BEGIN
fable_writeLOG: select nextval ('hibernate_sequence')
fable_writeLOG: insert into books (author, id) values ($1, $2)
fable_writeDETAIL:  parameters: $1 = 'Test Author2', $2 = '10'
fable_writeLOG:  execute S_1: COMMIT

fable_readLOG: SET SESSION CHARACTERISTICS AS TRANSACTION READ ONLY
fable_readLOG: BEGIN
fable_readLOG: select ....
fable_readDETAIL:  parameters: $1 = '2'
fable_readLOG:  execute S_1: COMMIT
You can view a complete example project with accompanying Docker Compose to build a database for you here.


